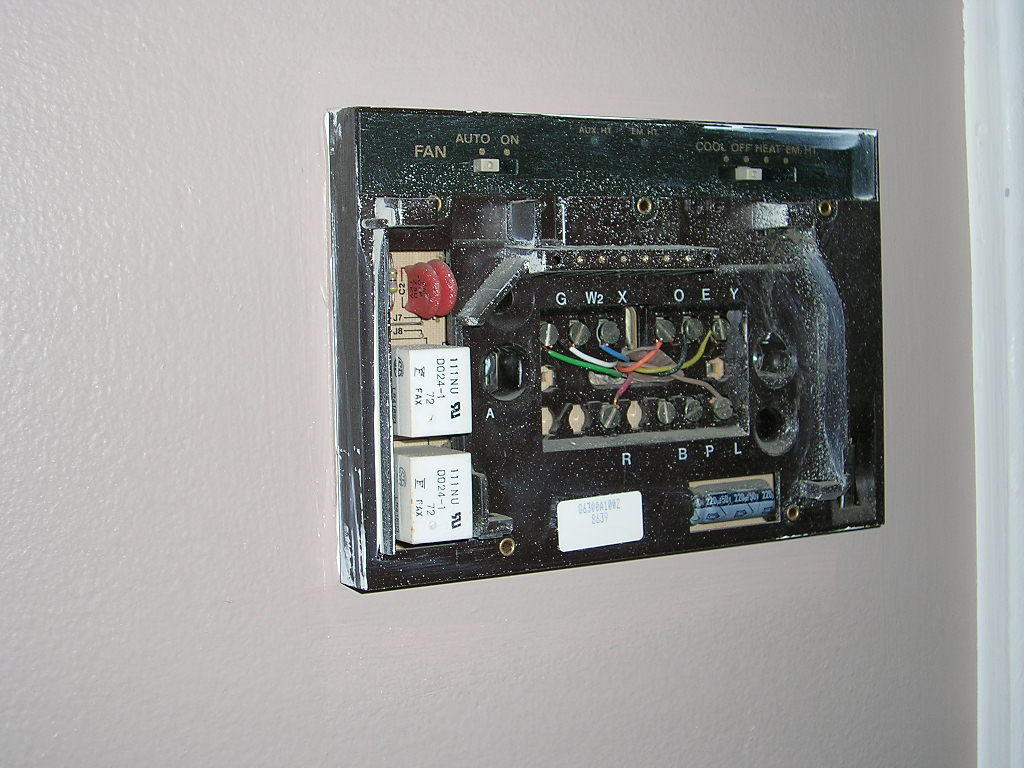
My previous "programmable" thermostat had the problem of not turning off the heat even when the set temperature was reached. So in the middle of the night in the winter the house would feel almost suffocating with the heat with temperature exceeding 80F when the set temp was around 72-74F. A quick look at the thermostat section at Home depot showed me that one could get a very good programmable thermostat for around 100 bucks. Not willing to risk installing the thing myself I thought I could get my warranty company(HMS) to get it replaced(after deductible $100). Well I put in the call and an "expert" from a Baltimore based heating company made a visit. After checking with his instruments at the base unit etc he concluded that the thermostat was bad. Installing a new programmble one would cost $250 of which the warrant company would only pay $75!!!! Out of that $250, $150 was for the part and $100 was for the labor. When I insisted that one could get a very decent thermostat for <$100 at Home Depot the lady at the heating company coolly told me install it myself if that was the case. After calling the warranty company I also found out that if I were to install it myself the warranty company would cover my expenses up to $94. Not a bad deal so I decided to dive into installing the thing myself. Taking off the cover plate of the thermostat reveals the following wiring.


A quick search on google gave me
this useful website. The only problem was I couldn't find the "C'" which was the transformer common. A call to the gentleman listed on that site got me the valuable info that 'X' on this diagram was actually the 'C' common. This particular gentleman praised the Hunter thermostats so much that I went and got one from Lowes for around $85. It was cheaper than the best Honeywell theremostats($100) and had more features than it. It is the
Hunter 44760 (auto temp heat pump thermostat) with 7 day programmable interface. It also has this neat feature where it changes between heating and cooling mode with change of seasons. Once I got that it was a simple matter mapping the symbols for the Hunter thermostat to my old one. The following are the symbols for the Hunter Thermostat from the
manual - R - 24AC supply
- Y1 - Compressor Stage 1
- W2 - Auxiliary heating
- E - Emergency heating
- O - Reversing valve(cooling mode)
- B - Reversing valve(heating mode)
- G - Fan
- L - System monitor
- C - 24 AC common
Mapping the old terminals to new one was straight forward except for the "C" and that info was given by the the gentleman mentioned above who said that "X" was the ground which is equivalent to "C'. That was enough for me to get started. Actually the manual gives a table of Hunter symbol mapping to the terminal mapping of other systems. So I didn't need the guy's help after all. With that I was able to get started with some reasonable confidence. I did have a problem with the length of the wires. Some of them were not sufficient to cover the length to the new thermo(and of course I broke some by mistake). Some new wire and electrical tape did the job. The new thermostat now works like a charm.
 Note: I am not a certified heat pump expert or installer. The knowledge provided is for informational purposes only. Standard disclaimers apply. HVAC Mechanic seems to a decent website for posing questions regarding heating/cooling units.